Tuesday, March 30, 2010

It's me again

It seems like I have a lot to say for myself this week. I just have to show off my latest pillowcases. I used the tutorial from you go girl for her on the edge pillowcase tutorial.  When I made the last lot of pillowcases I used this tutorial I'd found and made up the crochet myself. I was happy to follow Cassies great instructions this time as she had some great step by step photos. The fabric I used is French Hatbox from Tanya Whelan, one of her older lines.
 
I used  Heirloom 100% bamboo wool, double knit and was a little disapointed in how it washed up a little fluffy. I'll try cotton next time and expect a little shrinkage. These have been gifted to a lovely blogger who kindly gave me permission to tell you about them before they hit the post.
I have to say that I nearly had a nervous breakdown trying to sew blanket stitch with doubled thread that was 15 times the width of the pillowcase. I just could not stop the twisting and tangling. I tried doing half that length thinking I could secure the ends on both sides of the flap. Better but still driving me nuts. Finally I had the bright idea to use single thread and just sew two rows of blanket stitch. Ah, that was the answer for me, it worked a treat. I'll definitely be dressing up my pillows from now on, I love them.
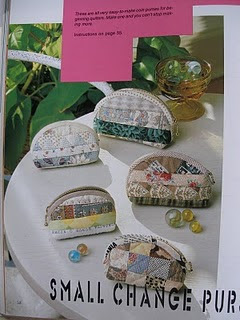
A couple of purchases were made from the trip I told you about last time. This is my latest book aquisition which is very good in my opinion.
I love step by step instructions.
It even explains how to draw and make templates for the designs. I've seen a few Sashiko books but this one stood out.
How about this flower fairy fabric? I don't have a clue what to make with it but I though the spots and sparke on it were lovely. No doubt it'll end up in some project for the grandkids.
 I have a couple of links for you.  I had a lovely comment on this post about the fusibles from Beth Ferrier.  I consider her an expert and it was her technique of applying the fusible and glue sticking the seam allowances that I followed. Scroll down the comments and have a read if you're interested to know what she has to say about the Wash Away applique sheets.

I also happen to think that blogger friends are the best and I'd like to say thank you for the offers of help I recieved for painting the bunny faces. I do feel challenged by them but I want to have another go.

Thanks Kaaren, my folk art hero and thanks also to Cath who happens to be the designer and also offered to help with the painting. Go check out these bunnies and bears and you'll see what I'm aiming for.
Cath along with Colleen and Julie have a business called Angels in Disguise and they have some beautiful stitchery patterns as well as prim dolls and all sorts of other goodies.

And I'm waving out to Pamina who has started some klosjes this last week. Woo hoo!
Happy stitching my friends, Janet

Monday, March 29, 2010

Sewing and shopping

Those bad, bad bunnies. These two are in time out, please don't pay attention to them, they'll just get worse. They wouldn't co-operate for the face painting session. As for pink bunny, she had a nasty accident and I'm afraid she didn't survive but it's ok because she was a donor bunny and her limbs were saved for a transplant.
Maybe if they behave (and I don't have another craft fail), I can let them pose for you at a later time.
When you have days like this you can click here to feel better.
Pattern is in the latest Homespun magazine, No.82 vol 11.3 See them sitting on the chair on the bottom left of the cover.
I did say Mr Q and I went on a day trip, to Berrima down the south coast. I love visiting one of the old antique shops there. The owner buys container loads of goods from mostly England and sells a lot for props in movies. I do happen to know that the fur coats in the Narnia movies came from here. I'm sorry I can't remember the name of the store but I took lots of photos to share.
Edit: I just found the name, its Peppergreen Antiques.
It seemed like everything they had, there was a lot of it. Buttons not only in containers but drawers and big plastic bins of them. I loved the scissors and cringed at the antique irons used in olden times.
Lots of French bakeware, containers filled with rolling pins, antique fishing reels and rods, cut throat razors. You name it, they probably had it.
And this collage is for the klosje enthusaists.
A whole wall of antique and vintage quilts and eiderdowns. These would be classified in the cutter category but I believe the owner has her own special collection. A lot were from the 30's to 60's I'm guessing.
A whole room was dedicated to textiles, linens and clothing. I just loved these vintage cloths.
From the patchwork shop, I picked up some bling for zippers.
 
We went to a Patisserie where we had coffe and bought these hot cross brioche, no spice but delicious cut and toasted on one side with lashings of butter. I'll be making my own spice ones this week.
I did do some other sewing in the weekend but it's getting washed and dried so next time I'll show and tell.

Saturday, March 27, 2010

Handing in my report card

It's Saturday and I've been out all day on a little day trip with Mr Q. I wish you could have come with me but I took photos so I can share but you'll have to wait until next time or this post will end up being huge.
I am reporting in with my klosjes for the week,  they look like these spools, not much room for thread.
Only twelve this week since I've been so busy. Any number over zero is good in my book.
I think I have the grand total of sixty five so far, not too shabby for three weeks.
I'm reporting back on the fusible products I was testing for applique on my last post.
Wash Away and Floriani Stitch n Wash Fusible are the two products. First of all, they need a medium heat with the iron and to be rinsed in warm water. They all have a percentage of soluble fibres which differ from one product to another.
For the Stitch N Wash it's 50% soluble and 50% non soluble fibres. They were ironed with a medium low heat and I stitched both products onto a piece of fabric.
I also sandwiched a piece of the Wash Away and stitched around it since this is what would represent the applique piece.
Here you can make out the amount of fibres for the Wash Away dissolving in the warm water.
If you click on the photo below, you can read the labels better.


Finally, the Stitch N Wash Tearaway. I should say that both products came out soft, contary to my first experiment but this tearaway has a little bit more body. Interestingly, the Wash Away didn't dissolve as many fibres in the piece that was sandwhiched but I dare say that after a few washes, that you'd get more fibres out.
I prepped this block ready to stitch using the Tearaway and I'll slit the back after washing to remove it. I used a glue stick to adhere the seam allowances. It pays to keep wipes and a handtowel on hand.
I should say that I'm a tried and true needle turner with a toothpick but I may use this method for difficult shapes. I like to have options and this was an interesting excercise.
Thanks to Miriam from Yellow Roses for giving me this lovely award which is so kind of her. Now, I'm rubbish with passing these on because I'm afraid I'll leave someone out. I visit so many inspiring blogs so I can't pick just twelve. To all bloggers who are out there putting their inspiring work on a blog, consider this awarded to you.

Thursday, March 25, 2010

Testing and stitching

I wasn't going to let the stitchery piece I did languish in a drawer so I made another purse, I'll keep this one, I love it and it turned out to be a fun excercise in doing something different.
I've been jumping around from one project to another for over a year and I hit the wall with flitting from one thing to another for long enough. The test blocks, ufo's, wisp have stonewalled me into some zombie like state of indecisiveness.

What to do next? What I need to do so that I feel like progress is being made is to concentrate and set a few goals.
What to play with? Pick one or two, any will do, what do I feel like? This is the mind working here, the cogs turning over.
So I decided to ignore the nagging from all those other projects for now and chose to make some progress with the Stars and Sprigs quilt.
If you read my blog, you'd know that my prefered method of applique is needleturn. I'm not an applique snob, I'm open to trying new methods or new products.

I decided to explore another way to prep my applique using these Wash-away Applique sheets from C&T Publishing. I thought itf I reversed my pattern pieces and used glue stick to adhere the seam on the back, it might speed the stitching up. I could then place all my pieces with glue and not have as much trouble with placement, not have to use an overlay and it would all go so much faster. Each block gets a wash in warm water afterwards to remove any glue.
Here's the other product I tried with the same method. Floriani Stitch N Wash water soluble tearaway.
You'd think if the product claimed to wash away, that's what would happen. Wrong. The Wash-Away remained on the stiff side and when I cut out the back of a piece, it had adhered to the fabric and nothing seems to have washed away at all. I ditched that idea.  I may do another test with this.

Second product, the Floriani Stitch N Tear is softer after washing and a slit on the back of the pieces allows me to tear away the product since the fusible had dissolved. Apparently, it gets softer with each washing. I think this was the better product to use and I may continiue with this one. It tears away from the back easier using a glue stick to place all the pieces rather than using basting glue. I have heard that this washes away a bit more with every wash, more testing is in order.

Is anyone else wondering how they can claim these products are wash away or water soluble?
I may continue to use the second product for these blocks since it did speed things up considerably, Each of the blocks only took one evening each to complete in front of the telly.
I've also been playing with the gingham Mr Q got for me, lots of limbs and other body parts here. I hope I can show you what they're supposed to be soon.

Saturday, March 20, 2010

Stitching bliss

My immunity for catching bugs of the quilty kind is a bit low at the moment. I've been stricken with the big stitch bug. First I caught it off Jan and so did Amy. I can't help it, I love big stitch, I love how the threads sit on the surface of the fabric and create another dimension. I love how the texture of the piece comes alive and the stitches seem to dance across the surface.
I've been on the computer, browsing around to satisfy my curiosity on  Japanese Boromono which translates to rag thing. I've seen similar with Indian Kantha stitching which is running stitch arranged very basically or done elaborately. This is all been so interesting, to me, I'm drawn towards the folk art, utalitarian nature of it all.
After Jan shared the link to those bags, and then making a pact with Amy to try some stitch love, I decided that I would play with a design that was similar.
I wasn't loving it and it was hard work going through the strips. The fabrics are some random solids I had lying in a bin but not good quality. When I went to wipe a mark off, the colour of the blue crocked badly so I decided to call it quilts and do some other smaller thing.
I had a piece of Japanese cotton that seemed perfect.
This was quick and I decided to deliberately go for a random, not perfect type of stitch. The best part was freeing myself from being uniform, I like it a lot and I'll make this into one of the small purses. I'm satisfied but It's not the end, I'll be revisiting this type of stitching.
Since it's Saturday, I get to show my Klosjes for the week. Twenty is not too shabby. I've started adding some peachy colours.
I've had a spurt on some book buying too,  all very inspirational, who knows what I'll get up to after reading these.
Since Easter is coming, I had another small project in mind if I get in the mood to do it. Mr Q went and got these for me at the LQS, he got a lot of funny looks but he did well.
After a week or two of play, my sewing room is the worst I think I've ever seen it. I even feel embarrased for myself . A clean up is in order before I can to the machine, that's if I can find it.

Wednesday, March 17, 2010

Little purse tutorial

I've tried to be thorough in my instructions at the same time  trying not to make this too photo heavy.
These purses finish at around 8" wide by 4 1/2" tall. I made two at the same time so the pictures may show either one.
First make a template out of cardboard by drawing two 8" diameter circles that overlap in the middle. Radius is 4" of course. Draw a line on each side to connect them and cut out.
You can make the one with the squares by cutting 24 x 2 1/2" squares and sewing them together in rows of four.
Cut a lining fabric and batting the same size, sandwich and quilt however you desire.
Place the template on top , draw around and cut out. For the one with squares, I centered the template using the seams as a guide.
Place pins at the half way mark on the sides.
Cut two strips of fabric on the bias, 2" wide and long enough to go around from one halfway point to the other. Press in half and sew to the top of the bag, backstitching at the begining and end.

Hand sew the binding to the back just a thread width beyond the stitching.
Place a pin at the middle and 3" either side on both sides of the bag. I use an oversized zip at least 20" ( 51cm) long.
Pin one side of the zip to the bag from one pin to the other as in the photo. Hand sew the binding edge to the zip and repeat for the other side. You can click on these photos for close ups to see which way to orient the zip.
That doesn't look too hard for zipper phobics now does it?
For the side that has the tail end of the zip,  fold  the sides  in to the middle, first holding the zip back out of the way, make sure  the binding edges meet snuggly together all the way to where the zip is sewn on. Rule a line 1 1/2" fom the point.
Pin the the zip back in place and sew on the line, backstitching at the begining and end.
For the other side with the head end of the zip, first close the zip and then make sure the binding edges meet inside, pin, mark and sew as before.
Trim 1/4" beyond the stitching on both sides.
Cut two pieces of lining fabric, 3 3/4" x 2" for tabs to cover the raw seams. Fold in half on the long sides and sew to the cut ends, zipper side underneath and on the same line as the previous stitching.
Turn the bag right side out and stich the binding edges together up to where the zip has been stitched previously to the binding. Do the same on both sides.
The tabs are now ready to be folded over the raw edges inside, pinned and hand stitched down.
Add some bling or other hardware to the zip end to make opening and closing easier and you're done.
Please feel free to use this pattern for personal use and share this pattern with friends but it is not to be sold.


I recieved a lovely gracious email from Rannveig about my little purse tutorial being the same as hers. Click here to see hers. It's purely coincidental as can happen and I applaud bloggers who keep an eye on these things.

Her one has the same shape and size and the zip is machine sewn in whereas mine is hand sewn. Her pattern is from a purse she had bought I think and mine came from a Japanese book but with changes made. I'll add a little note about this on the tutorial as soon as I have time. It's a very common purse and there are a lot of patterns out there the same or similar as we now realise.